





Will a Clamp-On Power Bar Fit Your Desk? What to Measure

In this article
A clamp-on power bar will fit only when the clamp can open wider than the desktop is thick, sit flat against the top and underside, and avoid the desk frame, apron, drawer and cables. Desktop thickness is the first measurement, but it is not the only one. A rounded edge, a support rail close to the perimeter or a steep bevel can prevent a secure fit even when the nominal thickness appears acceptable.
Before ordering, inspect the exact edge where you want the power bar. Measure the full stack of materials and compare it with the manufacturer's current compatibility information. If a maximum clamp opening is not published, ask the seller rather than assuming. The few minutes spent checking the edge can prevent an accessory that rocks, marks the finish or blocks another part of the workstation.
The five checks that determine fit
1. Desktop thickness
Measure from the top surface to the lowest point that the clamp pad must clear. Use a ruler or caliper at the intended mounting location. Do not rely on a general product description for the desktop because a live edge, underside reinforcement or layered construction can change thickness from one point to another.
The clamp needs usable travel beyond the measured thickness. A clamp that barely opens far enough can be difficult to position and may leave too little adjustment for the protective pads to sit correctly. Never force the screw or modify the clamp to gain a few extra millimetres.
2. Edge shape and surface contact
A square, flat edge gives the clamp predictable contact. A waterfall edge, pronounced bevel or irregular live edge reduces the flat area available. Check both the top and underside. The clamp's upper body and lower pad should land on stable, parallel surfaces rather than balancing on a curve.
Also look for fragile trim, a raised lip or a soft edge band. Tightening against a delicate profile can create a pressure mark. The correct installation pressure is the minimum that prevents movement during normal use, following the product instructions.
3. Underside clearance
Run your hand under the chosen location and look from below. A standing desk frame, crossbar, cable tray, drawer, controller cable or mounting plate may occupy the same space as the lower jaw and screw. Measure the horizontal distance from the edge to the first obstruction, plus the vertical room needed to turn the tightening knob.
This is the most common measurement people miss. A desktop can be thin enough while the frame leaves no place for the clamp. Moving the accessory a few inches to the side may solve the problem without changing products.
4. Front, side or back placement
Choose the edge according to use. A front or side position keeps outlets easy to reach but can compete with your forearms, mouse zone or chair movement. A back position keeps the work area cleaner but may be harder to access and can bring cords close to the wall.
On a height-adjustable desk, test the intended location at sitting and standing heights. Make sure the attached cords will not catch on a shelf, windowsill or nearby furniture. Our guide to mounting a power bar above or below a desk compares accessibility, visibility and cable routing.
5. Cord path and electrical requirements
A physical fit does not confirm electrical suitability. Health Canada advises consumers to check the rating for the products being connected and to follow the directions for both the equipment and the power bar. The rating indicates the power, voltage and current the product can supply safely.
Plan a cord route with no pinch point at the clamp. Keep cords away from heat and water, inspect them for damage and do not run them under rugs. At a standing desk, leave enough controlled slack for the full height range without creating a loop that can catch a foot or moving part.
How to measure your desk accurately
- Select two or three possible mounting points. A backup location is useful if the frame blocks the first choice.
- Measure thickness at every point. Record the largest value, including trim and reinforcement.
- Measure inward clearance. Note the distance from the edge to the frame, drawer or cable tray.
- Measure vertical clearance. Make sure the lower jaw and knob can be positioned and tightened.
- Photograph the edge and underside. A clear photo can help a seller confirm compatibility when published dimensions are incomplete.
Write the measurements in millimetres and inches. Canadian product pages may use either unit, and conversion errors are easy when the fit is close. A small margin is preferable to a theoretical exact match.
Special cases that need extra attention
Solid wood and live-edge tops
Solid wood tops can vary in thickness and edge profile. Select a flat section and use the protective surfaces supplied with the clamp. Do not assume that a visually straight edge is parallel underneath. If the finish is delicate, test the pad in an inconspicuous place and follow the desk manufacturer's care guidance.
Laminate and veneer surfaces
These surfaces can be durable, but the edge construction matters. Avoid clamping over loose edge banding or a damaged corner. Keep the pads clean so trapped grit does not scratch the finish. Tighten gradually and stop when the accessory no longer moves under light hand pressure.
Desks with drawers or aprons
A drawer directly under the top may eliminate front mounting. Side or rear mounting can work if it does not obstruct the drawer path. Remember that a drawer needs clearance both when closed and when fully open.
Height-adjustable desks
Inspect the frame at several heights because cables and nearby objects change relative position. The power bar moves with the desktop, while the wall outlet stays fixed. Route the supply cord so it reaches maximum height without tension and does not pool dangerously at minimum height.
What the Burotic power bar includes
The active Burotic Power Bar is currently offered in on-desk and under-desk models, with black and white colour options. The product description lists three power outlets, one USB port and one USB-C port. Because the current product page does not publish a universal desktop-thickness limit, confirm your measurements and the selected model before purchasing instead of relying on an assumed clamp range.
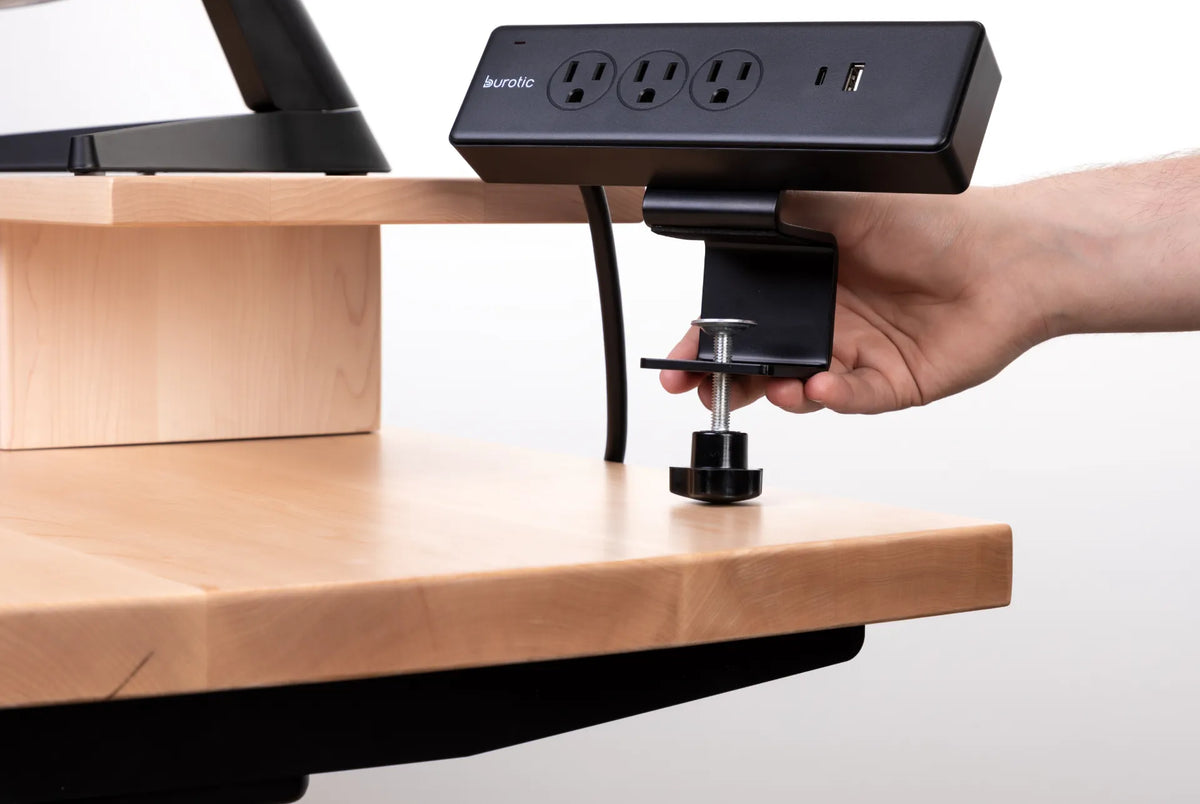
The on-desk model shown in the selected photo uses a black clamp at the edge of a light wood desktop. The image confirms the visible configuration, not compatibility with every desktop. Edge thickness, underside obstructions and the chosen model still have to be checked.
Fit problems to avoid
- The clamp touches only the edge radius: move to a flatter section or choose another mounting method.
- The screw hits the frame: shift the mounting point before tightening.
- The power bar rotates when a plug is inserted: unplug it, check pad contact and reinstall according to the instructions.
- The cord is pinched between the clamp and desktop: reroute it immediately.
- The cable becomes tight when the desk rises: lower the desk, unplug safely and revise the route before further use.
For installation steps after compatibility is confirmed, use our guide on installing a clamp-on power bar without damaging the desk. For a complete cord plan, see the desk power bar setup guide.
Electrical safety is separate from mounting
Use only an approved product suitable for the connected equipment. Health Canada notes that electrical products that plug into an outlet, including power bars, must be certified to the applicable Canadian national safety standard. Inspect cords and plugs for damage, keep them away from heat and water, and never remove the grounding prong.
A clamp makes the outlets convenient. It does not change the electrical rating, add surge protection or make an unsuitable load acceptable. If you are uncertain about a device, circuit or damaged product, stop using it and consult the manufacturer or a qualified electrical professional.
The practical answer
A clamp-on power bar fits when the desktop is within the clamp's verified range, both contact surfaces are flat, the underside is clear, the knob can turn freely and the supply cord can move safely through the desk's full range. Measure first, confirm the current product information and choose a second mounting location before ordering. That approach protects the desktop and produces a cleaner, more dependable power setup.

Previous article
What Desk Width Do You Need for a Laptop?
Next article
Can a Monitor Riser Hold Two Monitors? What to Check