





How Should You Arrange Four Monitors on a Desk?
A practical way to arrange four monitors without making every task a neck-turning exercise. Compare 2-by-2, horizontal and primary-screen layouts, then check desk space, mounting capacity and software alignment.

In this article
Four monitors can be useful when your work genuinely depends on several persistent views, such as code, dashboards, communications and reference material. The best arrangement is not automatically the most symmetrical one. It is the layout that keeps your most-used screen directly in front of you, places secondary information within a comfortable viewing arc and fits the desk without forcing the keyboard or mouse forward.
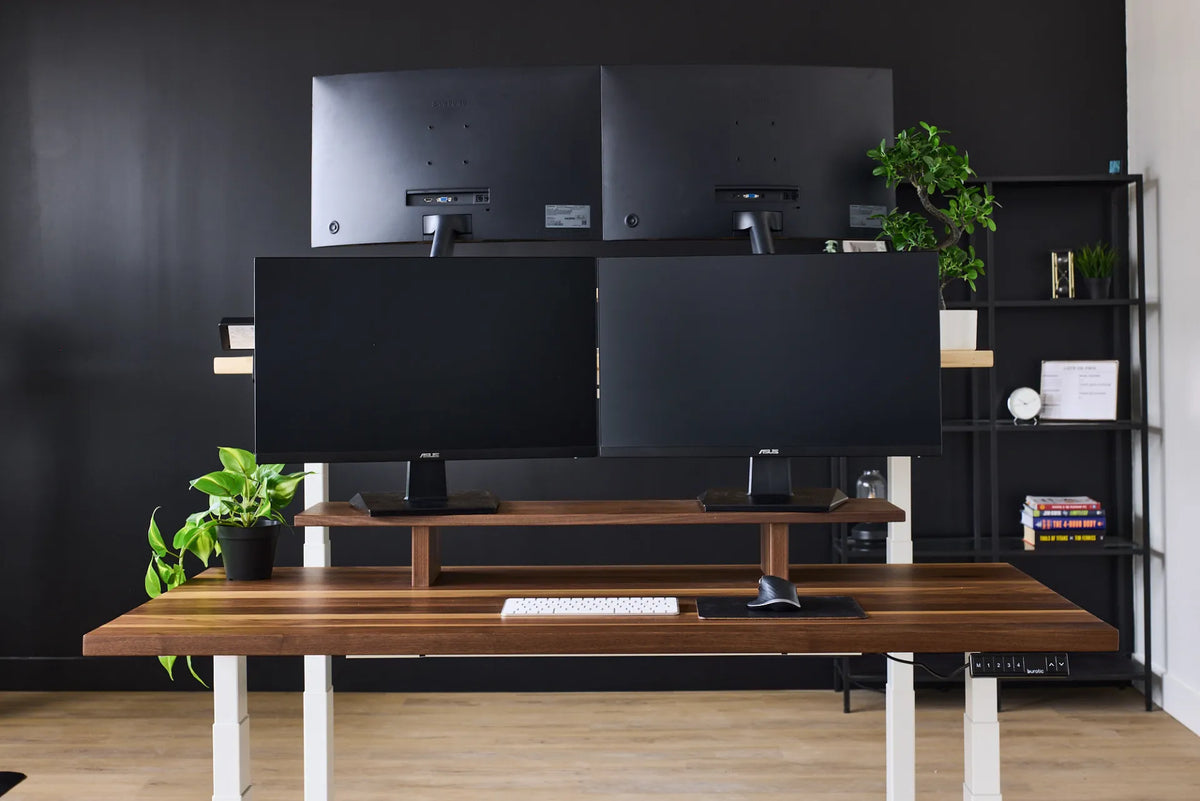
For most people, a 2-by-2 grid is the most practical four-monitor arrangement. Put the primary screen in the lower row, directly in front of your body, and angle the other three toward your normal working position. If you use all four screens equally, centre the meeting point between the two lower monitors in front of you. If one screen dominates, centre that screen instead and treat the others as reference displays.
Start with the work, not the symmetry
Before moving hardware, list what normally stays open on each screen. A developer might keep the editor on the primary display, a browser beside it, logs above and messaging in the remaining corner. A financial analyst may need a different hierarchy. The screen you look at for the longest uninterrupted periods should get the best position.
The Canadian Centre for Occupational Health and Safety recommends placing the most-used monitor directly in front of the user and arranging other displays to reduce head and body twisting. That principle matters more than whether the screens form a perfect rectangle.
When a 2-by-2 grid works best
A 2-by-2 grid controls overall width and keeps all four displays relatively close to the centre. It works well on a desk that cannot accommodate four screens in one long row. Keep the lower pair as the active work zone. Use the upper pair for information you glance at rather than content you read continuously.
The upper row should not make you repeatedly tilt your head back. Lower the complete array when possible, tilt the upper screens slightly downward and enlarge text before moving a screen closer. If the top row remains uncomfortable during normal work, it is too high or too important for that position.
When a horizontal row makes sense
Four screens in one row can work for monitoring tasks that involve frequent side-to-side scanning, but the total width is substantial. The outside screens may require repeated neck rotation, especially when every display is the same size. This layout usually needs a wide, deep desk and a clear reason for keeping all four screens at the same height.
When one primary screen should dominate
If one application accounts for most of your focused work, put its screen directly in front of your nose and keyboard. Place the second most-used display beside it. The two remaining screens can sit above or farther to the side for lower-frequency information. This arrangement may look less balanced, but it often produces a more comfortable workflow.
Set the primary screen first
Build the layout from your primary monitor outward. Sit or stand in your normal position with your head level and shoulders relaxed. Place the primary display directly ahead, generally about an arm's length away. The top line of the viewing area should usually be at or slightly below eye level. People using progressive lenses may prefer a lower screen position.
Next, bring the secondary displays close to the primary screen and angle them inward. The goal is a shallow arc around you, not a flat wall of screens. Small gaps are acceptable, but large gaps increase eye travel and make the software cursor feel disconnected from the physical layout.
Choose the physical arrangement carefully
Check desk width and depth
Four screens need more than nominal monitor width. Allow space for bezels, inward angles, the mounting hardware and the path of articulated arms. Desk depth matters because a large array can force the screens too close. If you are still deciding on the surface, compare your measurements with our guide to desk sizing for three monitors, then add the real width and mounting requirements of the fourth screen.
A sufficiently deep surface also leaves room for the keyboard and mouse to stay close to the body. Do not solve a monitor-space problem by pushing the input devices forward and reaching all day.
Verify every mount rating
Count the weight of each monitor without its factory stand and confirm the supported screen size, weight range, VESA pattern and desktop thickness for every arm or crossbar. A four-screen array can create meaningful leverage at the desk edge. Never assume that a mount rated for four displays fits every combination of panel size and weight.
If you are comparing mounting options, review how monitor arm weight capacity works. Burotic's monitor arm page can also help you verify the current product details before choosing hardware. Do not infer compatibility from the article photo.
Plan for a moving desk
On a height-adjustable desk, test the complete screen array at the lowest and highest positions you will actually use. Check wall clearance, cable slack and arm movement. Heavy multi-screen arrangements can also make small desk movements more visible, so tighten approved fasteners and follow the desk and mount manufacturers' instructions.
Align the screens as one visual system
Match the lower edges or the active viewing areas rather than relying only on the outer cases, which may differ. Keep screens at similar distances from your eyes. If monitor sizes or resolutions differ, adjust operating-system scaling so text and interface elements feel reasonably consistent.
Then open the display settings and drag the screen icons into the same positions as the physical monitors. Use the identify function to confirm each number. Line up the software rectangles carefully so the cursor does not jump vertically when it crosses a bezel. Select the true primary display so menus, notifications and new windows open in the intended place.
Test the layout with real tasks
Use the setup for several work sessions before finalizing cable routing. Notice which screen makes you turn your head most often. If it contains a core task, move it closer to centre. If an upper display requires sustained upward viewing, move that task down. If you lean toward small text, increase text size or adjust distance rather than accepting the posture.
A useful four-monitor setup should reduce window switching without creating constant physical switching. More screens are not automatically more productive. If two displays remain mostly empty, a simpler layout may be easier to position and maintain.
A practical final check
- The primary screen is directly in front of your normal working position.
- The lower row carries the tasks you use most.
- The upper row is reserved for glanceable information.
- All screens are readable without leaning or repeated large head turns.
- The mount is compatible with every monitor and the desktop.
- Cables have enough slack through the full desk height range.
- The operating-system layout matches the physical arrangement.
If you are building the workstation around a height-adjustable surface, start with the real screen dimensions and hardware loads, then choose a desk with enough usable width and depth. Burotic's Aspire Solid Wood Standing Desk is one current option to review, with sizes and specifications listed on its product page.
Sources
- CCOHS: Positioning the Monitor
- OSHA: Computer Workstation Monitors
- Microsoft Support: Use Multiple Monitors in Windows
This article provides general ergonomic information, not medical advice. If discomfort persists, consult a qualified health professional or ergonomist.


Previous article
Should Your Office Chair Fit Under Your Desk?
Next article
Should You Reposition Your Monitor When You Sit and Stand?