

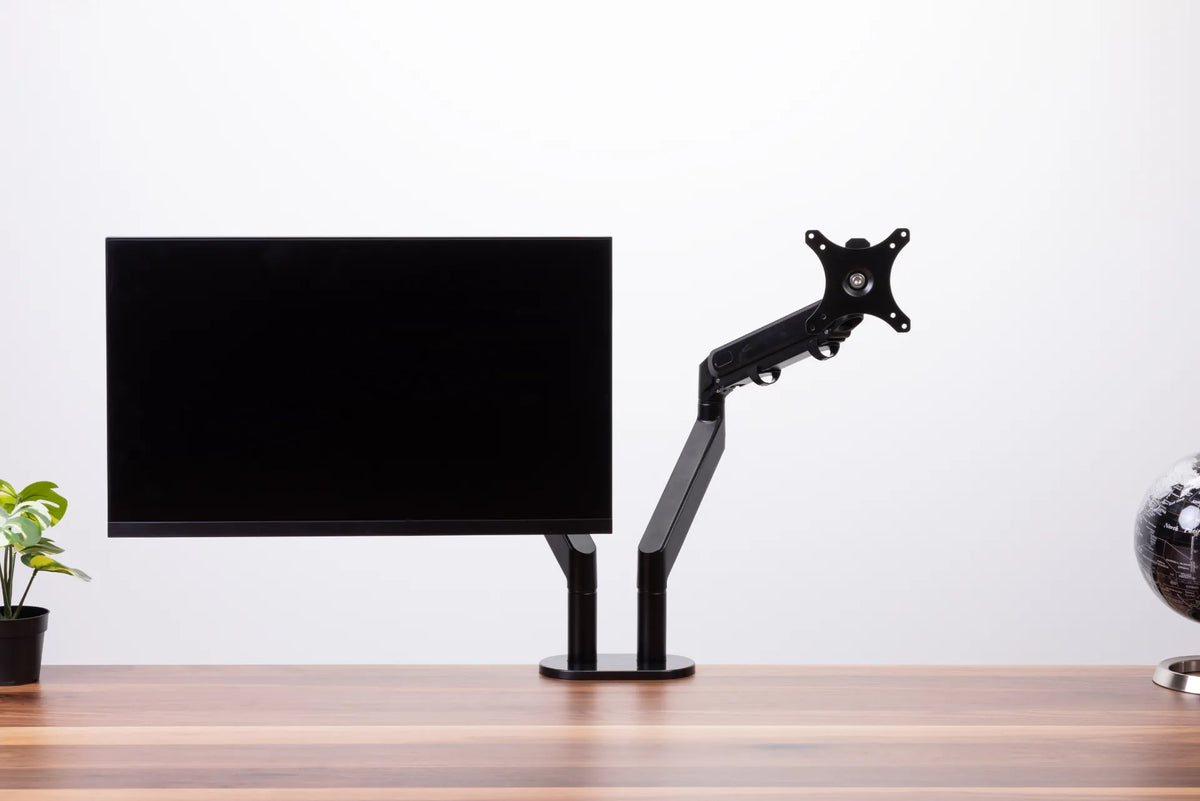
How to Stop Monitor Wobble on a Standing Desk

In this article
A monitor that shakes every time you type can make an otherwise solid standing desk feel unstable. The fastest fix is not to tighten every screw you can reach. First identify where the motion begins. A screen can wobble because the desk base moves, the desktop flexes, the clamp shifts, an arm joint is loose, the VESA plate is not seated correctly, cables pull on the arm or the screen is extended beyond a stable position.
Use a slow, methodical check. Disconnect power before working near electrical components, support the monitor before loosening mounting hardware and follow the instructions for the exact desk, arm and screen. If glass is cracked, a fastener is stripped, a mount is separating from the desktop or the screen cannot be supported safely, stop using the setup and seek qualified help.
Start by observing the movement
Place the desk at seated height and gently tap the front edge. Watch the feet, lifting columns, desktop, clamp, lower arm, upper arm, VESA head and screen. Repeat at standing height. Do not grab the screen while another person operates the desk. The goal is to see whether the entire workstation moves together or whether one connection amplifies a small vibration.
Next, type normally and move the mouse. Note whether the wobble appears only during forceful keystrokes, when the desk is high, after the screen is pulled forward or when one arm is loaded. A short video from the side can reveal the first part that moves, but keep the phone clear of the desk's travel path.
Separate desk wobble from monitor wobble
If the desktop, legs and screen sway together, begin with the desk. Confirm that the floor is firm, every foot is in full contact and the levelling glides are adjusted according to the manufacturer instructions. Check approved frame and desktop fasteners without overtightening. An uneven floor, loose frame connection or unusually flexible top can transmit movement to any monitor mount.
Compare seated and standing heights. A taller structure has more leverage, so a small movement may become easier to see at maximum height. That does not automatically mean the desk is defective. The standing desk wobble troubleshooting guide explains how to inspect the base, floor, load and assembly before blaming the screen hardware.
Check the clamp or grommet mount
Inspect the contact surfaces
Support the monitor, then look under and above the mounting point. A clamp should contact flat, sound surfaces. Decorative bevels, live edges, cable cut-outs, seams and underside rails can prevent full contact. A grommet mount needs the specified hole size, plate orientation and hardware. Do not improvise spacers unless the manufacturer approves them.
Clean dust or debris from the contact area after removing the mount safely. Inspect the desktop for crushing, cracks, swelling or delamination. A damaged surface cannot be made safe merely by adding torque. Follow the allowable thickness and edge-distance requirements for the arm and desktop.
Tighten only to specification
A loose clamp can slide, but overtightening can damage the desktop or mount. Use the supplied tool and instructions. Tighten evenly while confirming that the upper plate remains flat and the clamp screw does not press on an obstruction. The guide to clamping accessories to a desk covers edge shape, thickness and load placement.
Inspect the arm joints
Monitor arms contain several pivots. Some control horizontal movement, some control tilt and some use a spring or gas mechanism to balance screen weight. Identify each adjustment from the manual before turning anything. A tension screw is not necessarily a structural mounting screw, and the wrong adjustment can make the screen rise, fall or become harder to move.
Move one joint at a time while supporting the screen. Look for side-to-side play, a sudden drop, clicking, visible damage or a joint that cannot hold position. Adjust tension gradually within the stated range. If the screen is outside the arm's supported weight or size, added tension is not a reliable solution.
Verify the VESA connection
The VESA plate is the interface between the arm and the back of the monitor. Confirm that all required screws are present, match the specified diameter and length, and engage properly. Screws that are too long can damage the monitor. Screws that are too short may not hold enough thread. Use only the spacers or washers specified for a recessed or curved mounting area.
Some arms use a removable VESA plate that locks into the arm head. Confirm that the plate is fully seated and that any locking screw, tab or clip is engaged. Support the monitor while checking it. If the plate rocks against the monitor housing even when installed as directed, stop and contact the manufacturer.
Reduce leverage before adding tension
A screen extended far forward or to the side places more leverage on the clamp and joints. Bring it closer to the arm's centreline and compare the movement. Lowering an excessively high screen can also reduce leverage while improving viewing comfort. Keep the primary display in front rather than forcing the arm into a dramatic offset.
Dual arms need balanced planning. Two monitors do not have to weigh exactly the same, but each side must stay within the supported range and be adjusted independently. Avoid using one screen as a handle to move the entire assembly. Move the arm at its intended grip points if the instructions identify them.
Look for cable tension
A tight power, video or USB cable can pull the screen after every adjustment. Follow the arm's routing path and leave enough service loop at each moving joint. Secure excess length without binding the hinges. Check the entire desk travel because a cable relaxed while seated may tighten when the surface rises.
Separate cable pull from arm drift by disconnecting the screen cables after powering down and supporting the monitor. If the wobble or rotation disappears, rebuild the cable route with more slack. The standing desk cable management guide explains how to protect the full moving path.
Confirm the screen position ergonomically
A stability fix should not create an awkward viewing position. CCOHS recommends placing the screen directly in front, at a comfortable distance, with the top around eye level or slightly below as a starting point. Adjust for screen size, task, vision and eyewear. If stabilizing the arm requires placing the monitor too low, too far away or off-centre, the mount may not suit the workstation.
The active Burotic Monitor Arm page provides current configurations and compatibility information. Verify the exact monitor weight, mounting pattern, desktop thickness and installation method before choosing or changing an arm.
A safe diagnostic sequence
- Lower the desk, remove loose objects and power down the screen.
- Observe the workstation while tapping and typing lightly.
- Confirm floor contact, levelling and approved desk fasteners.
- Support the monitor and inspect the clamp or grommet connection.
- Check desktop condition and compatibility with the mount.
- Identify each arm adjustment from the official manual.
- Verify the VESA screws and locking mechanism.
- Bring the screen closer to the arm base and retest.
- Re-route cables with adequate slack at every moving joint.
- Test at seated and standing heights without exceeding rated limits.
When to replace or escalate
Stop troubleshooting if a component is cracked, bent, stripped, corroded or separating. Replace missing hardware only with parts specified by the manufacturer. Do not drill extra holes into an arm, add unapproved counterweights or use adhesive as a structural repair. A monitor is heavy enough to injure someone and damage equipment if a mount fails.
Escalate when the desktop is damaged, the clamp cannot contact a flat surface, the screen exceeds the supported range, the arm drops after correct tensioning or the desk remains unstable after assembly checks. Document model numbers, photos and the exact conditions that cause movement.
Final check
After adjustments, reconnect the cables, set the screen in its working position and move the desk slowly through the usable range. Type, move the mouse and lightly touch the desk at several heights. A small amount of visible movement can occur in adjustable equipment, but it should settle quickly and should not come from a loose or damaged connection.
The right fix addresses the first moving component. Start with the floor and desk, then move upward through the desktop, mount, arm, VESA plate and screen. This order prevents unnecessary tightening and makes the result easier to verify.
Sources: CCOHS, Monitor Positioning; CCOHS, Sit/Stand Desk; manufacturer instructions for the exact desk, mount and monitor.
Previous article
Home Office in a Living Room: Layout and Setup Guide
Next article
Home Office in a Living Room: Layout and Setup Guide