

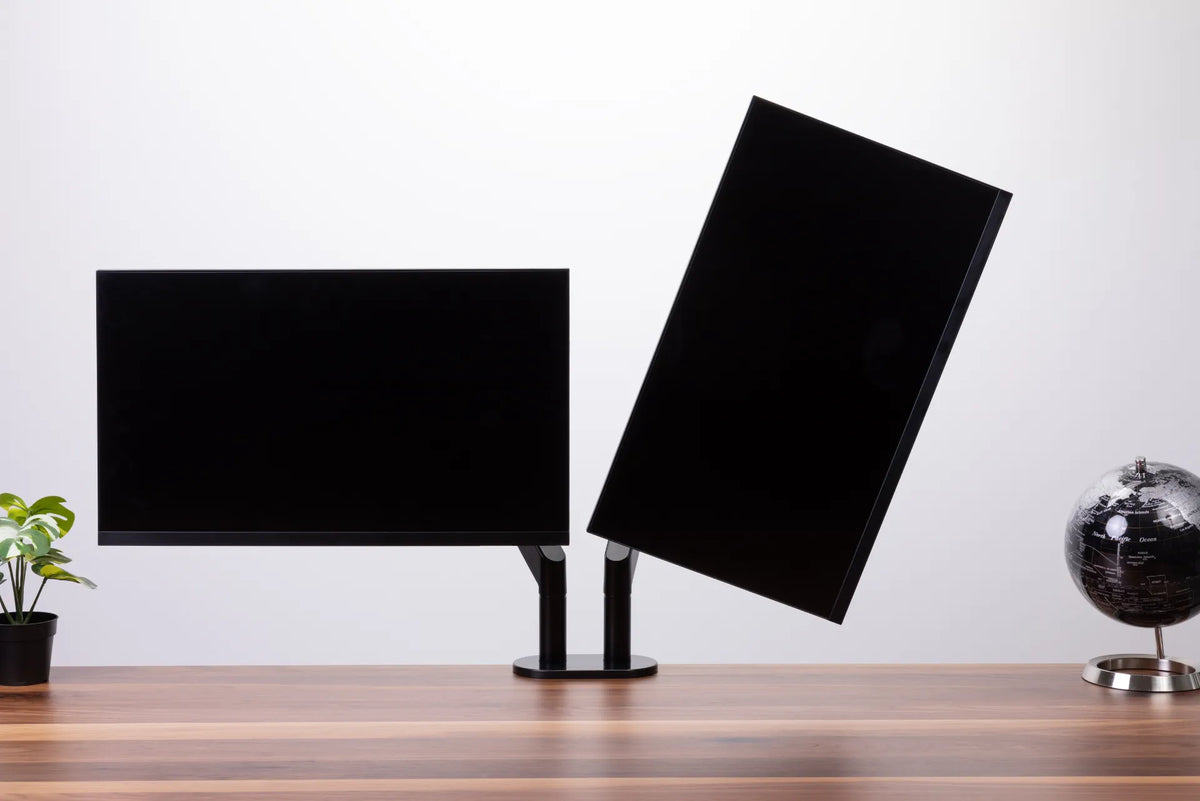
Vertical Monitor Setup Guide: When Portrait Mode Works Best

In this article
A vertical monitor can make long documents, code, chat channels and reference material easier to view, but portrait mode is not automatically more ergonomic or productive. The screen must suit the content, fit within a comfortable viewing zone and rotate safely on compatible hardware. For many users, the most practical arrangement is one landscape primary screen and one portrait secondary screen.
This guide explains when a vertical monitor setup works well, when landscape is the better choice, and how to plan placement, mounting and software settings. The recommendations are general. If screen use causes persistent pain, headaches, vision concerns or other symptoms, seek advice from an appropriate professional.
What is a vertical monitor setup?
A vertical monitor is a display rotated 90 degrees into portrait orientation. It shows more lines from top to bottom while providing less horizontal width. In a dual-screen arrangement, the portrait display often holds secondary or reference content while the landscape display remains centred for the main task.
Portrait orientation is a workflow choice, not a special monitor category. Many standard displays can rotate when their stand or arm supports it, their connections clear the mounting hardware and the operating system can change the display orientation. Check the exact product manual before rotating any screen.
Tasks that can benefit from portrait mode
Reading and editing long documents
Portrait orientation can show more of a report, contract, research paper or web page at once. This may reduce scrolling when the content follows a narrow column. It does not eliminate the need for readable text. If the page becomes too narrow or small, increase scaling or return to landscape.
Programming and log review
Developers may use a vertical screen for code, terminal output, logs or documentation while keeping the primary development environment in landscape. This can be useful when vertical context matters more than wide lines. Very long code lines, complex timelines and multi-panel tools may still work better horizontally.
Communication and project tracking
Email, team chat, task lists and calendars often fit a narrower secondary screen. Keeping them to one side can preserve the main screen for focused work. The tradeoff is distraction: a constantly visible message feed can interrupt concentration, so notifications and placement should match your role.
Photo and layout review
Portrait photographs, page layouts and social content can be easier to inspect in a matching orientation. Colour-critical work requires more than orientation, including an appropriate display and calibration process. Rotating a general office monitor does not create professional colour accuracy.
When landscape is usually better
Wide spreadsheets, video timelines, CAD interfaces, dashboards and side-by-side document comparison often need horizontal space. Most video also matches a landscape display. If the vertical screen forces constant horizontal scrolling or makes controls too small, it is solving the wrong problem.
A single portrait monitor can also be awkward as the only display for general work. Menus, browser tabs and video windows may feel cramped. Before buying hardware, rotate an existing compatible display for a short trial and use the actual applications that matter.
Choose which monitor is primary
The screen used most should normally sit directly in front of you. If your main work is writing, design, spreadsheets or video, that will usually be the landscape display. Place the portrait display to the side and turn it slightly toward you. The farther it sits from the centre, the more neck rotation it requires.
If portrait content is truly the main task, centre the vertical screen instead. Do not centre the gap between two displays when one is used far more than the other. Burotic's small-desk dual-monitor guide explains primary-secondary placement and usable surface space.
Set a comfortable height and distance
Keep the tall screen from becoming too high
A portrait display can extend well above a neighbouring landscape screen. The CCOHS monitor-positioning guidance notes that the top of a tall screen should not be above the operator's eye level. The exact comfortable viewing area depends on the person, screen and task, but repeated upward viewing is a sign to lower the display.
Use a practical viewing distance
Start at a distance where text is clear without leaning forward. Increase operating-system scaling before pulling a large screen too close. Very wide or very tall arrangements may require more distance to keep the content within a comfortable field of view. See Burotic's monitor distance guide for a step-by-step check.
Angle the secondary display
Turn the portrait display toward your seated position so the centre is easier to view. Avoid an extreme angle that creates glare or makes the bezels overlap. Check the arrangement both seated and standing if the desk changes height.
Confirm mounting compatibility before rotation
A monitor arm can make orientation and alignment easier, but only when all limits are respected. Verify the arm's supported screen size, weight range, VESA pattern, rotation capability and mounting method. Check the monitor weight without its removable stand and include any adapter plate.
Also inspect physical clearances. Ports and cables can collide with the arm in portrait mode. A thick lower bezel may become a side bezel. A webcam may no longer sit in a useful location. Controls that were on the lower edge may become harder to reach.
For two displays on one arm, each screen must fit the relevant rating and the combined arrangement must remain within the arm's specifications. A dual arm is not automatically suitable for every pair of monitors. Burotic's monitor-arm compatibility checklist covers the important measurements.
Plan the desk space
Portrait mode can reduce the horizontal footprint of one display, but the arm and clamp still need room. Measure the full screen dimensions after rotation, the arm's rearward reach and the distance to the wall. Make sure the clamp has an approved, unobstructed section of desktop and does not conflict with the desk frame, cable tray or drawer.
On a standing desk, test the arrangement throughout the entire height range. The tall screen must clear shelves and lights. The arm must clear the wall. Controlled cable slack must allow movement without pulling on a port. Never place the desk where rising equipment can strike a fixed object.
Configure portrait mode in software
- Connect the display and confirm that the operating system detects it.
- Open display settings and select the physical monitor you plan to rotate.
- Choose portrait orientation, then confirm the change.
- Arrange the on-screen monitor icons to match their real positions.
- Set the preferred primary display.
- Adjust scaling so text remains comfortably readable.
- Move the pointer across the shared edge and correct alignment if it jumps unexpectedly.
Menu names vary by operating system and version. Use current vendor documentation for your computer. If the image appears sideways during startup or in specialized software, verify whether that application supports the operating-system orientation.
Manage cables for rotation and desk movement
DisplayPort, HDMI, USB and power cables need enough length for the arm to rotate and for the desk to travel, but loose loops should not hang near moving joints. Route cables through the arm's intended channels without compressing them. Leave a controlled service loop at the screen and test slowly.
Do not use a cable to limit rotation or support the display. If a connector is under tension in portrait mode, choose a suitable cable or revise the route. The standing desk cable-management guide provides a full-range testing method.
Common vertical monitor mistakes
- Placing the top too high: lower the tall screen instead of tilting the head upward.
- Using portrait for every application: match orientation to content.
- Ignoring readable text size: use scaling rather than leaning forward.
- Centred gap, unequal use: centre the most-used screen.
- Assuming any stand rotates: verify mechanical and weight compatibility.
- Forgetting ports and controls: test clearances before tightening the mount.
- Leaving the secondary screen too far away: reduce unnecessary neck rotation.
Try the workflow before committing
A vertical monitor setup is most useful when the content genuinely benefits from height. Start with a short trial using a compatible screen, note which applications improve and which become harder, then adjust height, angle, distance and scaling. If most work stays on the landscape display and the portrait screen supports reference tasks without forcing frequent neck movement, the arrangement is doing its job.
Choose mounting hardware from verified specifications, give cables room to move and keep the primary task in the most comfortable viewing position. Portrait mode is a practical option, not a requirement. The best orientation is the one that makes your real work easier while supporting a neutral, changeable posture.
Previous article
Standing Desk Weight Capacity: How to Plan a Multi-Monitor Setup
Next article
How to Adjust The Loop Ergonomic Chair